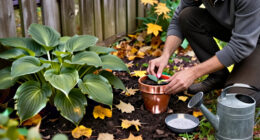
Install and test an automatic garden watering system that waters your garden on a schedule, using drip tubing or soaker lines to deliver water near plant roots. This guide is for beginners with a garden hose connection and a small or medium garden bed; it covers planning, basic parts, setup, programming, and a first-run check. Allow about 2-4 hours, depending on garden size and how much tubing you need to lay.

Get garden gear delivered free with Prime
- Fast, free delivery on millions of items
- Prime Video, Amazon Music and more included
- Member-only deals all year

Orbit Programmable Digital Hose Watering Timer – 1 Outlet, Battery Powered, LCD Screen, Built-in Rain Delay, Water-Resistant
- ✔ Outlet count: 1
- ✔ Power: Battery
- ✔ Display: LCD screen

Orbit One Outlet Single-Dial Hose Faucet Timer – Easy Programmable LCD Timer with Adjustable Watering Schedule (Model 62056)
- ✔ Outlet count: 1
- ✔ Battery type: AA, non-rechargeable
- ✔ Display: Large LCD
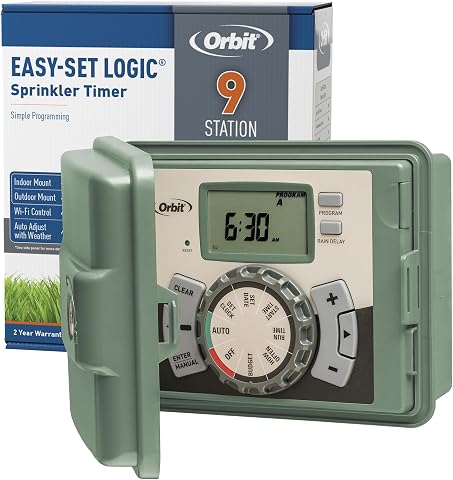
Orbit 57899 9-Station Outdoor Swing Panel Sprinkler System Timer
- ✔ Maximum zones: Up to 12
- ✔ Installation: Indoor or outdoor mounting
- ✔ Enclosure: Lockable cabinet with two keys
Difficulty: Beginner | Time: 2-4 hours
What You’ll Need
Tools & Materials:
- Garden hose faucet or compatible outdoor water connection
- Hose-end timer or irrigation controller compatible with your water source
- Backflow preventer if required by local code or the irrigation kit
- Filter and pressure regulator compatible with the tubing and emitters
- Mainline tubing, dripline or soaker hose, and suitable connectors
- Emitters or plants-compatible dripline, plus end caps or flushable ends
- Tubing stakes, scissors or tubing cutter, and measuring tape
- Bucket or measuring cup, garden gloves, and paper for a simple layout
Knowledge:
- Basic ability to connect and tighten garden-hose fittings
- Ability to identify garden beds, plants, and the hose faucet that will supply water
Check the irrigation kit and timer instructions before buying parts. Fittings, tubing diameter, pressure limits, and timer connections must match. Confirm whether your faucet supplies enough water for the planned zones: a simple bucket test can help. Open the faucet into a bucket for a timed interval, then calculate gallons per minute. Compare that output with the system maker’s instructions; divide the garden into zones if demand exceeds the available flow. Check local rules for backflow protection and outdoor watering schedules.
Orbit Programmable Digital Hose Watering Timer – 1 Outlet, Battery Powered, LCD Screen, Built-in Rain Delay, Water-Resistant
For a typical hose-fed garden, the Orbit 62061 offers the most balanced combination of approachable controls and useful scheduling options in this lineup. Its LCD lets us view and set a watering routine, while the duration and frequency adjustments make it possible to tailor watering to beds, containers, or other hose-connected areas. Most notably, the 24-, 48-, or 72-hour rain delay gives us a direct way to pause a schedule when rain makes another cycle unnecessary.Compared with the 62056, this model makes its rain-delay choices especially explicit in the supplied specifications and offers a water-resistant construction description. That makes it our strongest general recommendation for buyers who want a dedicated faucet timer without stepping up to a valve-based controller. The tradeoff is scale: it controls just one outlet, so a second hose or independently scheduled area requires another arrangement. It is also battery powered, which means we need to monitor the batteries rather than expect continuous power from an outlet.The six-year limited warranty is a useful ownership detail, but it does not change the basic fit: this is for automating a single faucet connection, not coordinating a full property’s sprinkler zones. Compared with the Orbit 57899, the 62061 is much simpler to add to an existing hose, but cannot match that controller’s multi-zone reach or cycle-and-soak options.
Pros:
- LCD screen supports visible, direct schedule programming.
- Adjustable watering duration and frequency suit different hose-watering routines.
- 24-, 48-, and 72-hour rain-delay choices help pause watering after wet weather.
- Water-resistant construction and a six-year limited warranty are useful outdoor-use considerations.
Cons:
- One outlet limits the timer to a single hose connection.
- Battery power requires periodic battery replacement or recharging.
Best for: Gardeners who want a clear, programmable timer for one outdoor faucet and value selectable rain delays.
Not ideal for: Buyers who need multiple independently controlled hose outlets or want to run an in-ground sprinkler system by zones.
Bottom line: We recommend the Orbit 62061 as the best all-round faucet timer here because its clear display and selectable rain delays make single-hose automation practical without pretending to replace a multi-zone controller.
“We recommend the Orbit 62061 as the best all-round faucet timer here because its clear display and selectable rain delays make single-hose automation practical without pretending to replace a multi-zone controller.”
Orbit One Outlet Single-Dial Hose Faucet Timer – Easy Programmable LCD Timer with Adjustable Watering Schedule (Model 62056)
The Orbit 62056 is a sensible choice when we want a hose timer whose central control is a single dial, supported by a large LCD. It automates one faucet connection and lets us set a start time, watering duration, and frequency. That covers the core job for a gardener who wants a regular hose schedule without installing a controller, wiring valves, or managing several zones.Against the 62061, the 62056’s clearest appeal is its single-dial programming and stated large display, along with a brass swivel connection. The two models otherwise overlap substantially: both serve one outlet, use batteries, and include rain-delay functionality. The 62061 is the more compelling pick if selectable 24-, 48-, and 72-hour rain delays and specified water resistance are priorities. The 62056 is better understood as an interface preference, not an upgrade in capacity.Its one-outlet design makes setup relatively focused, but it also sets a firm limit. We cannot use it to schedule multiple faucet-connected hoses independently, and its AA batteries need replacing. Like the 62061, it is not a replacement for the Orbit 57899 if the property has an in-ground network of 24 VAC valves. That larger controller takes more planning but serves a fundamentally different watering setup.
Pros:
- Single-dial controls provide a straightforward way to set a schedule.
- Large LCD makes schedule information easier to see while programming.
- Start time, duration, and frequency can be adjusted to the garden’s routine.
- Brass swivel connection and rain-delay functionality support everyday faucet use.
Cons:
- One outlet cannot independently automate several hose connections.
- AA batteries are required, so the timer is not mains powered.
Best for: Buyers who want a basic one-faucet watering schedule and prefer a dial-led interface with a large LCD.
Not ideal for: Gardeners who need multiple outlets, detailed zone management, or a controller for in-ground 24 VAC sprinkler valves.
Bottom line: We would pick the 62056 over the 62061 mainly for its dial-based operation, since it delivers a similar single-faucet role rather than broader watering capacity.
“We would pick the 62056 over the 62061 mainly for its dial-based operation, since it delivers a similar single-faucet role rather than broader watering capacity.”
Orbit 57899 9-Station Outdoor Swing Panel Sprinkler System Timer
When watering depends on several in-ground sprinkler zones, a faucet timer is the wrong tool. The Orbit 57899 is the specialist in this group: it can control up to 12 zones through compatible 24 VAC valves, making it the only option here intended to coordinate a larger valve-based irrigation layout. A swing panel with push-wire terminals is designed to simplify access during installation, and the lockable cabinet can be mounted indoors or outdoors.Its scheduling features also separate it from both hose timers. Cycle-and-soak windows can divide watering into intervals, while overlapping runtimes and rain delay provide more flexibility for a multi-zone system. That makes this controller more appropriate for established lawns and landscapes than either one-outlet Orbit model. The 62061 and 62056 are easier to use when the goal is simply to automate a garden hose; they do not require us to plan around valve compatibility, wiring, or zone configuration.That extra capability comes with an important qualification: this is not a plug-and-play faucet attachment. Buyers need compatible valves and a suitable irrigation layout, and the maximum of 12 zones may not cover a larger property. We should also treat the product’s “9-Station” name as a model title and use the supplied specification—up to 12 zones—when assessing capacity. For a small container garden, this controller adds complexity without solving a problem the simpler timers cannot handle.
Pros:
- Controls up to 12 zones for a broader irrigation layout than either faucet timer.
- Compatible with 24 VAC valves from Orbit, Hydro-Rain, and other major brands.
- Swing panel and push-wire terminals are intended to make installation and access easier.
- Cycle-and-soak, overlapping runtimes, and rain delay add scheduling flexibility.
Cons:
- Requires a compatible valve-based irrigation system rather than a garden hose connection.
- A 12-zone maximum may not meet the needs of larger properties.
Best for: Homeowners with an in-ground sprinkler system using compatible 24 VAC valves who need to schedule several zones.
Not ideal for: People seeking a quick hose-faucet timer, renters without access to irrigation wiring, or properties needing more than 12 zones.
Bottom line: We recommend the 57899 only for buyers with a compatible in-ground valve system, where its multi-zone scheduling is worth the added installation complexity.
“We recommend the 57899 only for buyers with a compatible in-ground valve system, where its multi-zone scheduling is worth the added installation complexity.”
As an Amazon Associate we earn from qualifying purchases.
Before You Start
Plan for root-zone watering rather than wetting every leaf. Drip systems work well for beds, containers, and rows, but a single zone may not suit plants with very different water needs. Keep the timer, filter, and regulator accessible for inspection. Do not connect tubing directly to high-pressure household water unless the system instructions explicitly allow it; excessive pressure can pop fittings or damage emitters. If the faucet is damaged, leaking, or lacks required backflow protection, correct that before installing the system.
Step-by-Step Instructions
Step 1: Map the plants and water source
Sketch the garden bed, mark the faucet, and note the location and type of each plant. Draw a route for the main tubing along the bed edge, then add branches or dripline beside plant rows. Group plants with similar water needs and sun exposure together. Keep tubing routes as short and direct as practical, and plan a separate zone for containers or plants that need a different schedule.
Tip:Leave a little slack at corners and around movable pots. Avoid routing tubing where a spade, mower, or regular foot traffic could damage it.
Check: Your sketch shows how water will travel from the faucet to every bed or container, with different watering needs separated into zones where appropriate.
Step 2: Choose compatible parts and check flow
Select a timer, filter, pressure regulator, tubing, and emitters designed to work together. Confirm the tubing diameter and connector type before purchase, and check the regulator’s pressure rating against the emitter or dripline instructions. Test faucet output by filling a bucket for a known period and calculating the flow rate. Compare that rate with the irrigation system’s capacity; plan additional zones if the system would demand more water than the faucet can supply.
Tip:A filter helps prevent grit from clogging small emitter openings. Use the filter mesh specified by the irrigation maker rather than guessing.
Check: The parts fit the same system standard, the regulator and filter match the kit requirements, and your planned zone flow is within the available supply.
Step 3: Lay out the tubing and emitters
Place the mainline and dripline along the route on your sketch without connecting them to the faucet yet. Cut tubing with a clean, square cut. Position emitters near the root area of each plant, following the spacing and flow guidance for the product and plant size. For rows, lay dripline with the emitter openings facing as directed by the manufacturer. Secure the tubing with stakes, but do not pull it so tight that fittings are under strain.
Tip:For a newly planted shrub or a large container, one emitter may not wet the full root area. Follow the emitter maker’s recommendations and check soil moisture during the first few runs.
Check: Every plant or row has a planned water outlet, tubing lies flat, and all cuts and fittings are accessible for connection.
Step 4: Connect the faucet-side components
Close the faucet. Attach the backflow preventer if required, then connect the timer, filter, and pressure regulator in the order shown by the kit instructions. Connect the mainline to the outlet side of the regulator and secure the fitting without overtightening. Add a washer if the hose connection requires one. Keep the filter bowl or screen oriented so you can remove and clean it later.
Tip:Many systems place the filter before the pressure regulator, but follow the sequence specified for your model. Do not assume all kits use the same arrangement.
Check: The timer and fittings sit firmly without crossed threads, and the tubing connects to the correct outlet with its intended washer or connector.
Step 5: Connect the zones and close the ends
Attach each mainline branch to its zone tubing with matching connectors. Push tubing fully onto barbed fittings; partial connections are a common source of leaks. Install end caps or the system’s flushable end pieces at every open line. If using a manifold or multiple timer outlets, label each zone by bed or plant group so you can program and inspect it accurately.
Tip:Use the tubing cutter or scissors recommended for your tubing. Ragged cuts can prevent a watertight fit.
Check: All branches connect securely, every line end is closed or fitted with its specified flush end, and zone labels match the garden layout.
Step 6: Flush the lines before the first run
Keep the timer off and open the faucet slowly. If the system has flushable line ends, open them and let water run until it appears clear, then close them according to the kit instructions. Watch the faucet connection, filter, regulator, branch connectors, and emitters for leaks or loose tubing. Turn the faucet off before making repairs or pushing tubing back onto a fitting.
Tip:Flushing removes debris that could block emitters. Do not leave open line ends unattended; water can wash out soil or flood a nearby area.
Check: Water runs through each line, debris has cleared from flush ends, emitters discharge as expected, and connections remain attached without visible leaks.
Step 7: Program the timer and test watering
Set the timer clock and choose the correct start time, watering days, and run duration for each zone. Begin with a conservative duration based on the system instructions and your soil, plant type, and weather; do not copy a schedule without checking local conditions. Run each zone once while you watch it. After watering, wait briefly, then check soil moisture near the roots with a finger or trowel. Adjust run time or frequency so the root area is moist without standing water or runoff.
Tip:Watering early in the morning often reduces evaporation. Follow local restrictions, and pause or reduce watering after rain if the timer does not have a rain sensor.
Check: The timer starts and stops each zone at the programmed times, water reaches the root areas, and no line leaks, sprays unexpectedly, or causes runoff.
Common Mistakes to Avoid
- Connecting incompatible tubing, connectors, or emitters. — Check product specifications and match tubing diameter, fitting type, pressure range, and flow capacity before assembly. Test a sample connection if the kit allows it.
- Running too many emitters or too much tubing on one zone. — Use the measured faucet flow and system capacity to plan zones. Split the garden when the combined demand exceeds the manufacturer’s limit.
- Setting a long schedule and assuming every plant receives enough water. — Check soil moisture at root depth after a test run. Adjust by plant group, soil type, and weather instead of relying only on surface appearance.
- Leaving line ends open or skipping a filter. — Fit the specified end caps and filter before regular use. Flush the lines during setup and clean the filter as directed.
Troubleshooting
Problem: One or more emitters do not release water.
Solution: Turn off the faucet, open the line’s flush end, and flush the branch. Clean or replace clogged emitters and check for a kink, blocked filter, closed valve, or loose connection.
Problem: Water leaks at a hose connection or tubing joint.
Solution: Close the faucet and inspect the washer, fitting alignment, and tubing cut. Replace a damaged washer or connector, cut the tubing square, and fully seat it. Tighten by hand or as the product instructions specify; overtightening can damage threads.
Problem: Water reaches the first plants but not the end of the line.
Solution: Check for a kink or clogged filter and compare the line length and emitter count with the kit’s limits. Shorten the line or divide it into separate zones if supply pressure or flow is insufficient.
Problem: The timer does not run or the schedule is wrong.
Solution: Check the battery or power source, clock, start time, watering-day settings, and manual or rain-delay mode. Confirm the faucet is open and consult the timer instructions for a reset if settings remain unreliable.
What Success Looks Like
The system waters each planned zone on its programmed schedule, emitters deliver water near plant roots, and fittings remain dry and secure. Soil should be moist through the active root area after a run, without persistent puddles, runoff, or dry sections. Confirm the timer’s clock and schedule after its first automatic cycle, and check the garden again after a few days to refine run time.
Next Steps
Inspect the system after the first few automatic cycles, then check it regularly for leaks, clogged emitters, shifted tubing, and timer changes after a battery replacement or power interruption. Clean the filter on the schedule in the product instructions. Adjust watering after rain, heat, planting, or seasonal changes. Before freezing weather, drain or store components as the manufacturer directs; remove batteries if the timer will be stored. If a zone still has poor flow after flushing and checking fittings, use the product maker’s flow limits to redesign the zone or ask an irrigation professional to inspect the supply.
Frequently Asked Questions
How long should an automatic garden system run?
There is no single duration for every garden. Start with the kit’s guidance, then check moisture near the roots after a run. Increase or reduce duration based on soil, plant type, emitter output, weather, and whether water is reaching the full root area without runoff.
Can I connect a drip system to an ordinary garden faucet?
Many hose-end drip systems are designed for a standard outdoor faucet, but use the required backflow device, filter, and pressure regulator. Check faucet flow and the product specifications before connecting the system.
Should containers and garden beds share one timer zone?
Use separate zones when containers and beds need different watering frequency or duration. Containers often dry faster than in-ground beds, while plant types and sun exposure can also change watering needs.
How often should I clean the filter and flush the lines?
Follow the system maker’s maintenance schedule. Clean the filter when flow drops or debris is visible, and flush lines during setup and whenever emitters begin to clog. Turn off the faucet before opening fittings.
Halloween Picks
halloween
As an affiliate, we earn on qualifying purchases.